- Analiz
- karmasik bir problemi ya da sistemi daha küçük parçalara ayirmak
- Orüntü Tanima
- Problemler arasindaki ve içindeki benzerlikleri gormek
- Soyutlama
- Yalnizca onemli bolümlere odaklanmak,alakasiz detaylari gormezden gelmek
- Algoritma Tasarimi
- Probleme adim adim bir cozüm gelistirmek
March 1st, 2019
Sayisal düsünmenin temel taslari*
Bunu stars çizerken gorebilirsiniz
Bir yildiz çizmek için, bu basamaklara ayirirsiniz:
- hide the turtle
- put the pen down
- point in direction 130 degrees
- repeat 40 times
- move 200 steps
- turn right 130 degrees
Hadi yapalim
Soyutlama: Input
Hadi bütün ozel numaralari unutalim.
Yani baska bir deyisle, soyutlama yapalim
N: Kaç kenarli çizecegiz?angle: Her kenardan sonra ne kadar dondürecegiz?R: Yariçap, merkezden her tepeye olan mesafe.initial_angle: baslangiç açisi.size: Her kenarin uzunlugu.
Analiz: Adimlar
input values’lari bildiginiz goz onüne alinacak olursa, suna ihtiyaciniz var:
- Birinci koseye
Radim ilerle initial_angleyonünü isaretleNkere tekrar etsizeuzunlugunda bir çizgi çizanglederece saga çevir
Orüntü Tanima
Bu durumda orüntüyü gormek çok kolay:
sizeuzunlugunda bir çizgi çizanglederece saga dondür
Bu orüntü N kez tekrarlaniyor
Bunu bir loop ile kolayca yapabilirsiniz.
Pratik
Hadi yildiz çizmek için bir fonksiyon yazalim:
Ipucu
initial_angle,90+angle/2olmalisize,2*R*sin(angle*pi/360)olmali
Beyin firtinasi: Neden bu degerler?
R scripts kullanacagiz
Geçen yariyil RMarkdown kullanmistik
Bu yariyil R Scripts kullanacagiz
Aradaki farki anladigimizdan emin olalim
R programlari insa ediyoruz, R belgeleri degil
Geçen yariyil documents’lari yaratmistik,sayfalar ve slaytlar gibi
Bunlar .Rmd uzantili dosyalardi
Bu yariyil programs’lari ve kodlari olusturacagiz
Bunlar .R uzantili dosyalar olacak
Soru “dosya uzantilari” nedir?
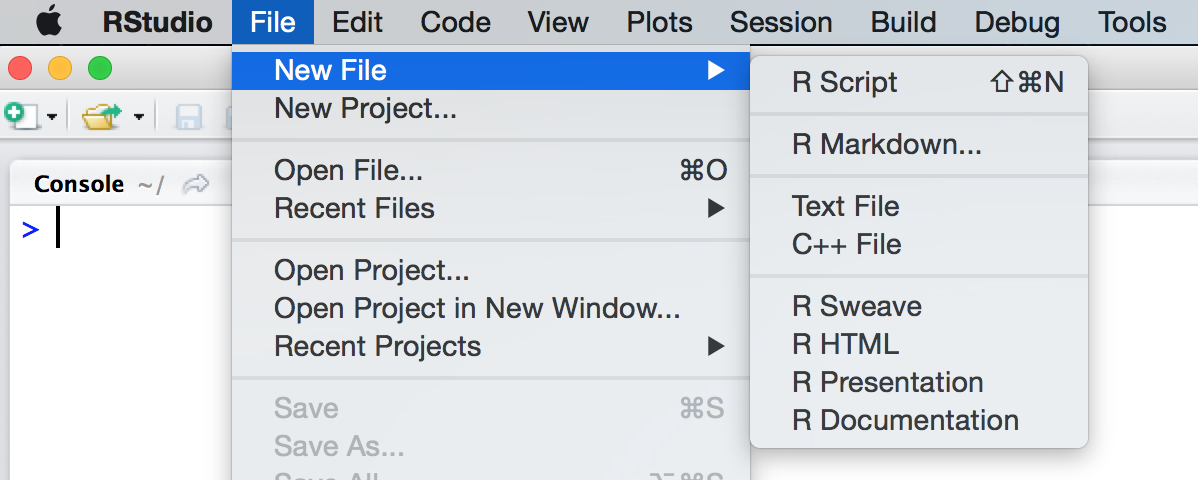
Kodu Editleme ve Yürütme
Yeni bir dosya yaratmak için File -> New File menüsünü kullanin:
Tek Bir Çizgiyi Yürütme
To execute the line of source code where the cursor currently resides you press the Ctrl+Enter key (ya da Run araççubugu tusunu kullanin):

Birden Fazla Çizgiyi Yürütme
Birden fazla çizgiyi yürütmede 2 yol gorüyoruz:
Çizgileri seçmek ve
Ctrl+Entertusuna basmak (ya da Run araççubugu tusunu kullanin)Tüm belgeyi çalistirmak için
Ctrl+Shift+Entertusuna basmak (ya da Source araççubugu tusunu kullanin).
Buradaki Source’un anlami,“dosyadaki tüm kodlari çalistir”dir.
Source on Save
When editing functions you may wish to set the Source on Save option for the document
Enabling this option will cause the file to automatically be executed every time it is saved
Klavye Kisayollari
Daha birçok kisa yollar mevcuttur. Daha ise yararlardan bazilari:
Ctrl+Shift+N- Yeni belge
Ctrl+O- Belgeyi aç
Ctrl+S- Aktif belgeyi koru
Ctrl+1- Source Editor odagi konumuna tasi
Ctrl+2- Console odagi konumuna tasi
Programdaki hatalar
![]()
Bugs
(bəɡ) noun
- küçük bocekler.
- informal bakteri veya virus gibi zarar verici mikroorganizma.
- an insect of a large order distinguished by having mouthparts that are modified for piercing and sucking.
- genel olarak gozetlemek için bir odaya ya da telefona saklanmis minyatür mikrofon.
- bir bilgisayar programindaki ve sistemindeki hata.
RStudio ile Hata Düzeltme
Hata düzeltme, sizin bug’lari bulmaniza yardimci olmak için tasarlandi.
Bunu yapabilmek için, asagidakilere ihtiyaç var:
- Kodu çalistirmaya baslamak
- Bir proble oldugundan süphelendiginiz yerde kodu durdurmak
- Kod boyunca adim adim inceleyerek ilerlemek
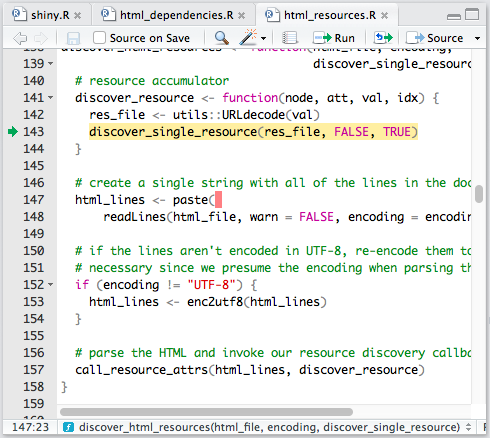
Stopping on a line
Editor breakpoints
The most common way to stop on a line of code is to set a breakpoint.
Bunu çizgi numarasi üzerinde sol tiklayarak yapabilirsiniz, ya daShift+F9 basarak.
Hata Ayiklayiciyi kullanmak
Kodunuz bir kere durdugunda, “debug mode”a girebilirsiniz. 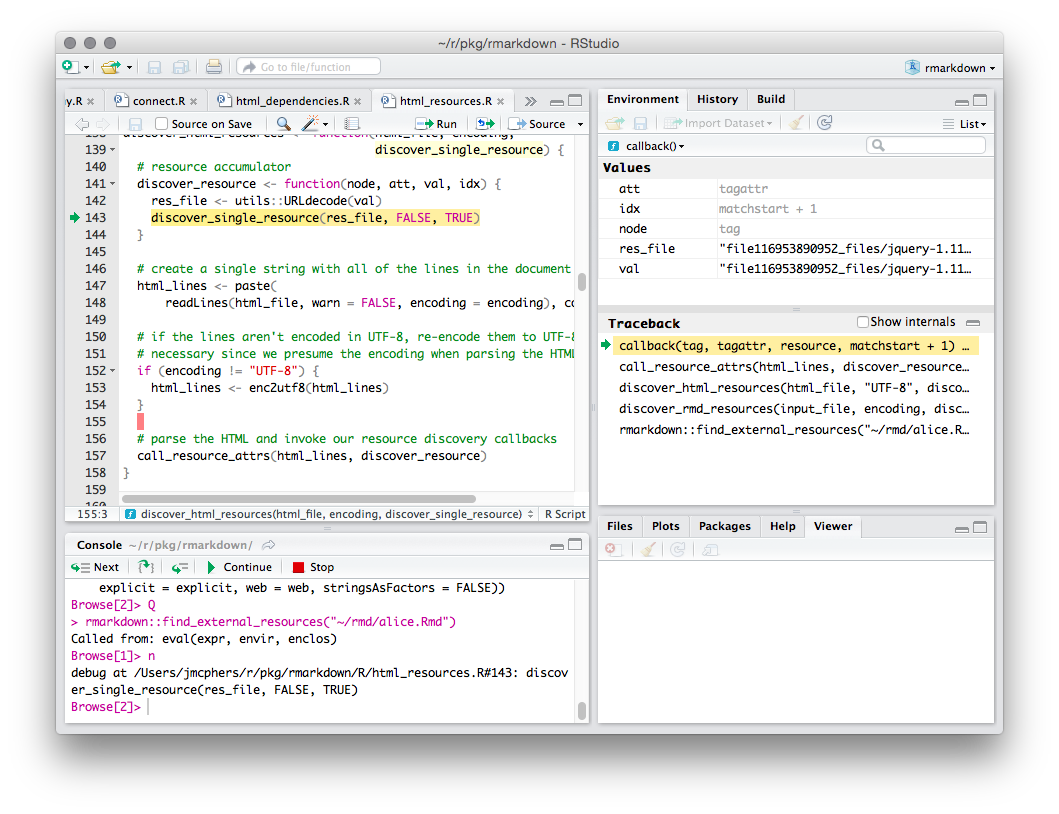
Ortam penceresi
R ’da genelllikle “global environment” ile iliskilli olacaksiniz
In debug mode, RStudio shows the currently function’s environment
- The objects you see in the Environment pane are in the current function
- Your commands will be evaluated in the context of the function
Environment window

Code window
The code window shows you the currently executing function. The line about to execute is highlighted in yellow
Console
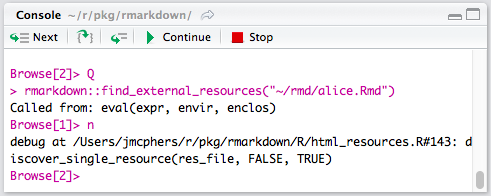
Console
Hata düzeltme yaparken, R console’da iki degisiklik goze çarpar
Birincisi, komut isteminin farkli oldugudur
Browse[1]>
Bu komut istemi gosteriyor ki, R çevresel tarayicisinin içindesin.
Console
Hata düzeltme yaparken bütün normal komutlari kullanabiliriz, ayni zamanda bunu da:
- Commands are evaluated in the current environment
- If your function has a variable named
x, typingxat the prompt will show you the value of that variable
- If your function has a variable named
- Pressing
Enterat the console will execute the current command and move on to the next one - Several special debugging commands are available
New toolbar on top of the console:

This toolbar provides buttons for debug control commands
- There’s no difference between using the toolbar and entering the commands directly
- learn the command shortcuts
Hata düzeltmede kullanilan ekstra komutlar:
| Komut | Kisayol | Anlami |
|---|---|---|
n or Enter |
F10 |
Execute next statement |
s |
Shift+F4 |
Step into function |
f |
Shift+F6 |
Finish function/loop |
c |
Shift+F5 |
Continue running |
Q |
Shift+F8 |
Stop debugging |
You can also type help at the Browse[N]> prompt
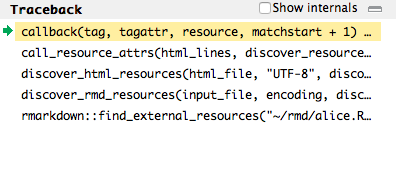
Traceback
The traceback shows you how execution reached the current point,
- from the first function that was run (at the bottom)
- to the function that is running now (at the top).
Çubuk-Insan
Draw a head
turtle_right(90)
turtle_forward(4.5)
turtle_left(90)
turtle_forward(9)
turtle_left(90)
turtle_forward(9)
turtle_left(90)
turtle_forward(9)
turtle_left(90)
turtle_forward(4.5)
turtle_right(90)

Arms
# upper body
turtle_forward(9)
turtle_right(180)
turtle_forward(3)
# arms
turtle_left(90)
turtle_forward(9)
turtle_right(90)
turtle_right(90)
turtle_forward(18)
turtle_left(180)
turtle_forward(9)
turtle_left(90)

Draw the first leg
turtle_forward(10)
turtle_forward(5)
# first leg
turtle_right(40)
turtle_forward(10)
turtle_forward(3)
turtle_left(90)
turtle_forward(3)
turtle_left(180)
turtle_forward(3)
turtle_right(40)
turtle_right(50)
turtle_forward(13)

Draw the second leg
# get back to initial angle
turtle_right(40)
turtle_right(90)
turtle_left(10)
turtle_right(20)
# second leg
turtle_left(5)
turtle_left(40)
turtle_forward(13)
turtle_left(90)
turtle_forward(3)
turtle_hide()

Bunu basitlestirebilir miyiz?
Replace repeated pattern by loop
turtle_right(90)
turtle_forward(4.5)
turtle_left(90)
turtle_forward(9)
turtle_left(90)
turtle_forward(9)
turtle_left(90)
turtle_forward(9)
turtle_left(90)
turtle_forward(4.5)
turtle_right(90)
turtle_right(90)
turtle_forward(4.5)
for(i in 1:3) {
    turtle_left(90)
    turtle_forward(9)
}
turtle_left(90)
turtle_forward(4.5)
turtle_right(90)
(use h key)
Boyut degisebilir
turtle_right(90)
turtle_forward(4.5)
for(i in 1:3) {
    turtle_left(90)
    turtle_forward(9)
}
turtle_left(90)
turtle_forward(4.5)
size=9diyelim (simdilik)
turtle_right(90)
turtle_forward(size/2)
for(i in 1:3) {
    turtle_left(90)
    turtle_forward(size)
}
turtle_left(90)
turtle_forward(size/2)
(use h key)
Kollari basitlestirmek ve genellestirmek
# upper body
turtle_forward(9)
turtle_right(180)
turtle_forward(3)
# arms
turtle_left(90)
turtle_forward(9)
turtle_right(90)
turtle_right(90)
turtle_forward(18)
turtle_left(180)
turtle_forward(9)
turtle_left(90)
# beden
turtle_forward(size*2/3)


# kollar
turtle_right(90)
turtle_forward(size)
turtle_right(180)
turtle_forward(size*2)
turtle_left(180)
turtle_forward(size)
turtle_left(90)
ilk bacak
turtle_forward(10)
turtle_forward(5)
# first leg
turtle_right(40)
turtle_forward(10)
turtle_forward(3)
turtle_left(90)
turtle_forward(3)
turtle_left(180)
turtle_forward(3)
turtle_right(40)
turtle_right(50)
turtle_forward(13)
turtle_forward(15)

# ilk bacak
turtle_right(40)
turtle_forward(13)

turtle_left(90)
turtle_forward(3)
turtle_left(180)
turtle_forward(3)
turtle_right(90)
turtle_forward(13)
farkli boyutlari deneyin
turtle_forward(15)
turtle_right(40)
# first leg
turtle_forward(13)
turtle_left(90)
turtle_forward(3)
turtle_left(180)
turtle_forward(3)
turtle_right(90)
turtle_forward(13)
turtle_forward(size*15/9)
turtle_right(40)
# first leg
turtle_forward(size*13/9)
turtle_left(90)
turtle_forward(size/3)
turtle_left(180)
turtle_forward(size/3)
turtle_right(90)
turtle_forward(size*13/9)
Ikinci bacakta kodu temizleyin
# baslangiç açisina geri don
turtle_right(40)
turtle_right(90)
turtle_left(10)
turtle_right(20)
# first leg
turtle_left(5)
turtle_left(40)
turtle_forward(13)
turtle_left(90)
turtle_forward(3)
\(40+90-10+20 = 140\)
# baslangiç açisina geri don
turtle_right(140)


# ilk bacak
turtle_left(45)

turtle_forward(13)
turtle_left(90)
turtle_forward(3)
Soyutlama & Analiz
draw_person <- function(size) {
  draw_head(size*1.2)
  turtle_left(180)
  turtle_forward(size)
  turtle_left(90)
  draw_arm(size*1.5)
  turtle_left(180)
  draw_arm(size*1.5)
  turtle_left(90)
  turtle_forward(size*2)
  turtle_left(20)
  draw_leg(size*2)
  turtle_right(40)
  draw_leg(size*2)
}
Bu, ana fonksiyon.
Bu benim alanim.
Degistirebilirim.
Sen degistirmemelisin.
Onun yerine, bas, kollar ve bacaklar için fonksiyonlar gelistirmelisin.
Body parts
draw_head <- function(size) {
}

draw_arm <- function(size) {
}

draw_leg <- function(size) {
}
This is a Contract
Each part commits to do something
Each part makes a promise
We promise to leave the turtle in the same position as we received it
Hadi kollarla baslayalim
Her zaman kolay olan bolümlerle baslamalisiniz.
Ilk bolüm her zaman kolay olmayabilir.
Turtle’i kolun basladigi noktaya kol yonünde aliyoruz.
Turtle’i ayni yerde ve ayni açida birakmaliyiz.
draw_arm <- function(size) {
    turtle_forward(size)
    turtle_backward(size)
}
Kollardan bacaklara
draw_arm <- function(size) {
    turtle_forward(size)


    turtle_backward(size)
}
draw_leg <- function(size) {
    turtle_forward(size)
    turtle_left(90)
    turtle_forward(size/3)
    turtle_backward(size/3)
    turtle_right(90)
    turtle_backward(size)
}
Undoing
Notice that to undo something you have to undo each part in reverse order
Once çoraplarinizi giyer, ardindan ayakkabilarinizi ayaginiza geçirirsiniz.
To undo you first “un-put” your shoes, then your socks
In general
\[Undo(A,B,C) = Undo(C), Undo(B), Undo(A)\]
Baska bir yol daha var
Each function has a separate environment with its own variables
Konumu ve açiyi baslangiçta bellege alabiliriz ve sonda bunlari resetleyebiliriz
draw_leg <- function(size) {
    old_pos <- turtle_getpos()
    old_angle <- turtle_getangle()
    turtle_forward(size)
    turtle_left(90)
    turtle_forward(size/3)
    turtle_setangle(old_angle)
    turtle_setpos(old_pos[1], old_pos[2])
}
Bu, karmasik bir çizim yaparken yararlidir. Lütfen hatirlayin
Separation of concerns

Büyük bir sorunu bagimsiz parçalara boldük.
Sozlerimize sadik kaldigimiz sürece,her boloümü bür digerini etkilemeden degistirebiliriz.
Ornegin ellerin pozisyonunu,basin ve ellerin seklini,diger seyleri degistirebiliriz.
The code is in stick-person-2.R.
Hareketli çubuk-insan
Çubuk-insan birçok seyi açikliyor
Çubuk-insan çizimi kolaydir
Ve ise yarar
Hikayelerde insanlar olmasini severiz
Bu, mesaji daha kisisel hale getirir
Ornek: Universal Modeling Language (UML)

Çubuk-insanlar mühendislikte kullanilabilir
- to define and communicate
- who are the agents and
- what are the possible actions
on each use case
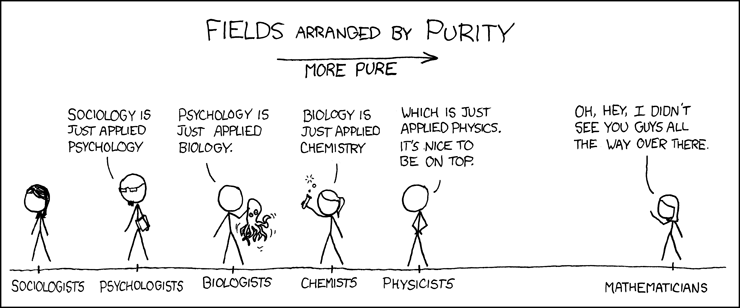
Example: explaining “Impostor Syndrome”
XKCD Comic

Example: explaining areas of Science
XKCD Comic
There is an xkcd library for R
Creative comics with real data
library(xkcd)
gb <- read.delim("../../2018/cmb2/genbank-size.txt", stringsAsFactors=FALSE)
ratioxy <- diff(range(gb$Release))/diff(range(gb$WGS.Bases))
axes <- xkcdaxis(range(gb$Release), range(gb$WGS.Bases))
axes[[3]]$text$family <- "Humor Sans"

man1 <- xkcdman(aes(x = 140, y = 5.0e+11, scale = 8e+10, ratioxy,
        angleofspine = -1.704265, anglerighthumerus = -0.5807903,
        anglelefthumerus = 3.941945, anglerightradius = 0.0441480,
        angleleftradius = 3.222387, anglerightleg = 5.274786,
        angleleftleg = 4.349295, angleofneck = -1.820286), data=NULL)

man2 <- xkcdman(aes(x = 196, y = 2.8e+11, scale = 8e+10, ratioxy,
        angleofspine = -1.389649, anglerighthumerus = -0.2829418,
        anglelefthumerus = 3.379656, anglerightradius = 0.6164104,
        angleleftradius = 3.073443, anglerightleg = 5.116607,
        angleleftleg = 4.316328, angleofneck = -1.319579), data=NULL)

ggplot(gb, aes(Release,WGS.Bases,label="0")) +
    geom_text(family="Humor Sans", alpha=0.8) + axes + man1 + man2 +
    theme(plot.background = element_blank()) +
    annotate("text", x=160, y=75e10, family="Humor Sans",
        label="Genbank data\nkeeps growing!") +
    xkcdline(aes(x=145, y=5e11, xend=165, yend=65e10),
        data=NULL, xjitteramount = 10)

Faces can illustrate complex data
Invented by Herman Chernoff in 1973
- Insanlar yüzleri ve ufak tefek degisiklikleri ayirt edebilirler.
- Bir insanin yüz seklindeki data’yi gostebiliriz.
- Gozler, kulaklar, agiz ve burun bizlere boyut konum ve ve uyumlariyla bize bu konuda degerler sunar.
Bilimsel ilerlemelerde karikatürlerin yeri olabilir
https://doi.org/10.1371/journal.pcbi.1005845.g005
Burada yayinlanmistir:
Ten simple rules for drawing scientific comics.
McDermott JE, Partridge M, Bromberg Y
PLoS Computational Biology 14(1) (2018): e1005845.
Homework
Homework 3

I will give you a function called draw_person(size)
Your task is to write the functions draw_head(), draw_arm() and draw_leg().
Then, when you use draw_person(10), you should get a person
This is draw_person(size)
draw_person <- function(size) {
  draw_head(size*1.2)
  turtle_left(180)
  turtle_forward(size)
  turtle_left(90)
  draw_arm(size*1.5)
  turtle_left(180)
  draw_arm(size*1.5)
  turtle_left(90)
  turtle_forward(size*2)
  turtle_left(20)
  draw_leg(size*2)
  turtle_right(40)
  draw_leg(size*2)
}